
Understanding the Basics of Kitchen Sink Plumbing
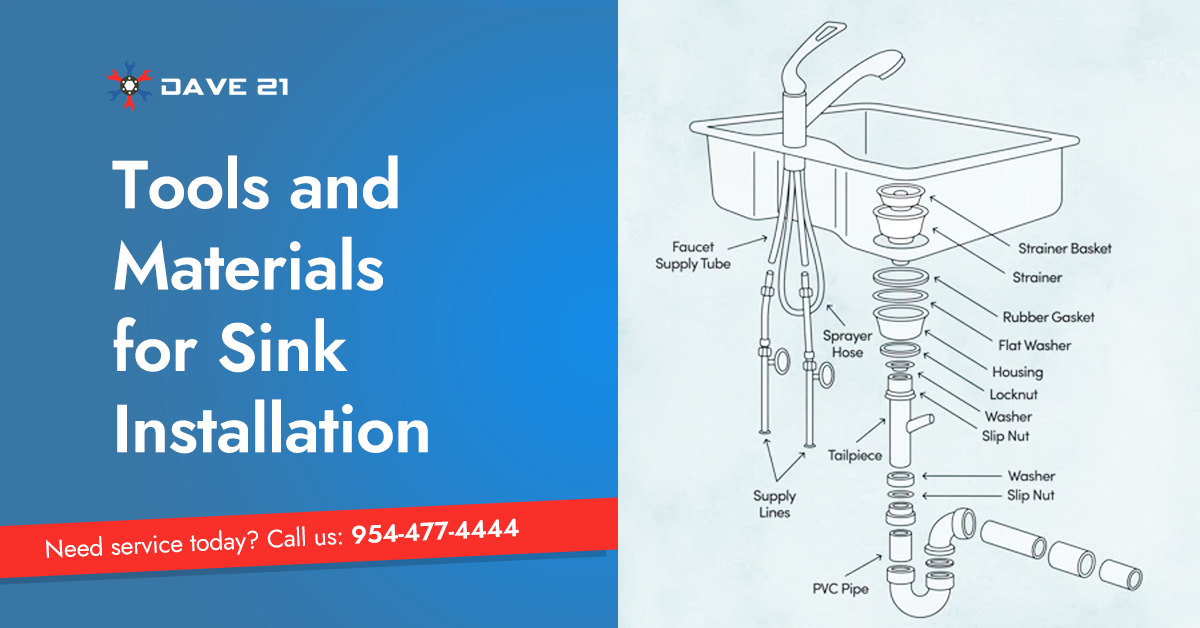
Before you grab any tools, you need to understand how everything connects. Your kitchen sink plumbing system has a few key parts working together. Water supply lines bring fresh water to your faucet. The drain system carries dirty water away. In between, you have the strainer, tailpiece, trap, and drain pipe.
The p-trap is that curved pipe under your sink. It holds water to block sewer gases from entering your home. Every kitchen sink needs one. The tailpiece connects your strainer to the p-trap. From there, a drain pipe carries water to your main plumbing system. Understanding these parts helps you troubleshoot problems and complete repairs with confidence.
Tools and Materials for Sink Installation
Having the right tools makes any job easier. For kitchen sink plumbing, you will need a few basics. Grab some adjustable pliers, a pipe wrench, plumber’s putty, and Teflon tape. You will also want a bucket to catch water when disconnecting pipes. A hacksaw helps cut PVC or tubular pipes to the correct length.
Most hardware stores sell complete kits with everything you need. These kits save time and ensure all your fittings match. Make sure you know your pipe diameter before shopping. Most residential setups use 1.5-inch pipes. Double sink configurations might need special fittings to connect both basins to one drain.
Picking the Right Sink Plumbing Kit
A quality sink plumbing kit includes the tailpiece, P-trap, slip joint washers, and connecting pipes. Some kits come with flexible drain options. Flexible pieces make installation easier in tight spaces. They bend to fit awkward angles without cutting.
Look for kits made from PVC or chrome-plated tubular brass. PVC costs less and resists corrosion well. Tubular brass looks nicer if your pipes are visible. Check that your kit includes the right adapter for your drain size. A complete kit eliminates multiple trips to the store

How to Plumb a Kitchen Sink Step by Step
Ready to start? First, turn off the water supply lines under your sink. Place a bucket underneath to catch any leftover water. Remove the old pipes by loosening the slip joint nuts. Clean the area before installing new parts.
Start by attaching the strainer to your sink basin. Apply plumber’s putty around the flange for a watertight seal. Thread the strainer body from below and tighten it. Next, connect the tailpiece to the strainer. Hand-tighten the slip joint nut first, then snug it with pliers. Working on kitchen sink plumbing takes patience. Rush the job, and you will deal with leaks later.
Connecting the P-Trap and Drain Pipe
The sink trap is your next step. Attach the p-trap to the tailpiece using a slip joint connection. The curved part should face downward. Then connect the other end to your wall drain pipe. Adjust the height so everything lines up without stress on the fittings.
Tighten all connections by hand first. Then give each nut a quarter turn with pliers. Over-tightening cracks plastic fittings. Run water and check for drips at every joint. If you spot a leak, tighten that connection slightly. Proper kitchen sink plumbing means zero drips when you finish.
Garbage Disposal and Dishwasher Drain Installation
Adding a garbage disposal changes your setup a bit. The disposal mounts directly under one basin. It connects to power and has its own drain outlet. Your tailpiece connects to the disposal instead of the strainer. Garbage disposal installation requires following the manufacturer’s instructions carefully.
If you have a dishwasher, it needs to connect too. The dishwasher drain hose attaches to your disposal or tailpiece. Most disposals have a knockout plug for this purpose. Remove the plug before connecting the hose. Use a hose clamp to secure the connection tightly.
Tips for a Leak-Free Connection
Leaks cause water damage and mold growth. Nobody wants that headache. Here are quick tips for success:
- Apply Teflon tape to all threaded connections
- Use plumber’s putty on strainer flanges
- Hand-tighten first, then use tools
- Check alignment before final tightening
- Test with running water for five minutes
Take your time during kitchen sink plumbing projects. A few extra minutes checking connections saves hours of repair work later. Run your dishwasher through a cycle and watch for drips at the drain hose connection.
Common Kitchen Sink Plumbing Mistakes to Avoid

Even handy homeowners make mistakes sometimes. The most common error is over-tightening fittings. Plastic cracks easily under too much pressure. Another mistake is using the wrong pipe diameter. Mismatched sizes cause leaks and slow drainage.
Skipping the p-trap is dangerous. Some people think they can connect directly to the wall drain. Without a trap, sewer gases enter your home. That smell is not just unpleasant; it is unhealthy. Also, avoid using too much plumber’s putty. Excess putty squeezes into your pipes and causes clogs. Keep your kitchen sink plumbing clean and simple for the best results.
When to Call a Plumber for Kitchen Sink Plumbing
Some jobs need professional help. If you discover corroded pipes in the wall, call a plumber. Moving drain locations requires permits and expertise. Major plumbing repair work often involves codes you might not know about.
Persistent leaks after multiple attempts signal a bigger problem. A licensed plumber has the tools and training to diagnose issues fast. They spot problems you might miss entirely. Kitchen sink plumbing connects to your whole plumbing system. One mistake can affect other areas of your home. When in doubt, hiring a pro protects your investment and gives you peace of mind.
Trustindex verifies that the original source of the review is Google. These guys are the best. It was extremely easy -went to the website afterhours and posted a chat message. Sam called me right away and we scheduled for two days later to replace two toilets. They gave the option of picking up the products and removing the old toilets. They got here in time, worked quietly, cleaned up spotlessly, and everything was done in 90 minutes. 10 out of 10. Highly recommend. Update: reached out via the chat tool and Sam responded pretty promptly - service was professional and timely and reasonable - can't ask for better servicePosted onTrustindex verifies that the original source of the review is Google. Sam so profesional could resolve problem asapPosted onTrustindex verifies that the original source of the review is Google. I'm very satisfied for the work has been done here, especially a very professional job. highly recommended for detecting problems, locating pipe underground and fix issue! you can save a lot of money!Posted onTrustindex verifies that the original source of the review is Google. Thank you for your service, the tech you send Sam was wonderful, he fixed my leak under the kitchen sink really quickly and efficiently. Price was good! recommend 100%Posted onTrustindex verifies that the original source of the review is Google. Asam was amazing. He called every few hours to update me on his arrival time. He was very neat and left the area spotless. Only reason I didn't give 5 stars was whoever passed the job to Asam was a bad communicator. I was chasing him for answers.Posted onTrustindex verifies that the original source of the review is Google. Good job donePosted onTrustindex verifies that the original source of the review is Google. Cleared the main drain from the roof. Good job.Verified by TrustindexTrustindex verified badge is the Universal Symbol of Trust. Only the greatest companies can get the verified badge who has a review score above 4.5, based on customer reviews over the past 12 months. Read more
Frequently Asked Questions
Q: How long does it take to install kitchen sink plumbing?
A: For most homeowners, basic installation takes two to four hours. This includes removing old pipes and installing new ones. Adding a garbage disposal adds another hour. Professionals complete the same work faster due to experience and specialized tools.
Q: Can I use flexible drain pipes for my entire setup?
A: Flexible pipes work great for certain connections, especially in tight spaces. However, rigid PVC pipes provide better long-term durability. Use flexible pieces only where angles make rigid pipes difficult. Mixing both types gives you the best results.
Q: Why does my sink drain slowly even after cleaning the trap?
A: Slow drains often mean a clog deeper in your plumbing system. The blockage might be past the p-trap in the wall drain pipe. Try using a drain snake to reach further. If that fails, a plumber can use professional equipment to clear the line.
Q: Do I need to replace all the pipes when installing a new sink?
A: Not always. If your existing pipes are in good condition, you can reuse them. Check for cracks, corrosion, or mineral buildup. Damaged pipes should be replaced. New sinks sometimes have different drain hole positions requiring new fittings.
Q: How do I know if my p-trap is installed correctly?
A: A properly installed p-trap holds water in the curved section. Pour water down the drain and look underneath. You should see water sitting in the bend. If the trap drains completely, it is installed backward or has a leak.
Q: What causes kitchen sink plumbing to leak at the connections?
A: Most leaks happen from loose fittings or worn washers. Over time, slip joint washers dry out and crack. Temperature changes also loosen connections. Check all nuts periodically and replace washers if you spot drips. Proper alignment during installation prevents most leak issues.